
 A wave of young people washed up on the shore of Lake Ontario this week – and they’re all looking for Pokémon.
Since last weekend, the trails down by the water in my neighbourhood have been peppered by youngsters (and the not-so-young folk who just love the franchise). That is, of course, because of the Pokémon Go game that recently came out. I hear the kids are looking for Squirtles and other water-oriented Pokémon, which are thought to be most prevalent near water.
In Canada–where summers are fleeting–it’s nice to see people enjoying being outside, even if they are glued to the game. I haven’t minded sidestepping them on the sidewalk, and it’s been funny to watch them run through the nearby college campus.
All this brings back memories of my little brother, who had about five Pokémon Gameboy games as a kid, and would always watch the show when it was his turn with the remote. Weirdly, he has not been keen on the resurgence of Pokémon now… But never mind, I have enough nostalgia for the both of us.
The trend has also repolarized Pokémon crochet patterns, which I have seen popping up on Reddit and other forums. A few years ago, there was a big Pokémon amigurumi trend, so there’s plenty of pattern options for people who want to create a baby Charmander – or my recent obsession, a Bulbasaur that you can grow a plant in. How cute is that?! I saw the pattern and now I can’t find it… Ugh.
I was inspired to join in the craze by my friends at the podcast Geek Top Five. Check them out! This week there’s a great list of sought after Pokemon, and some details about the new game.
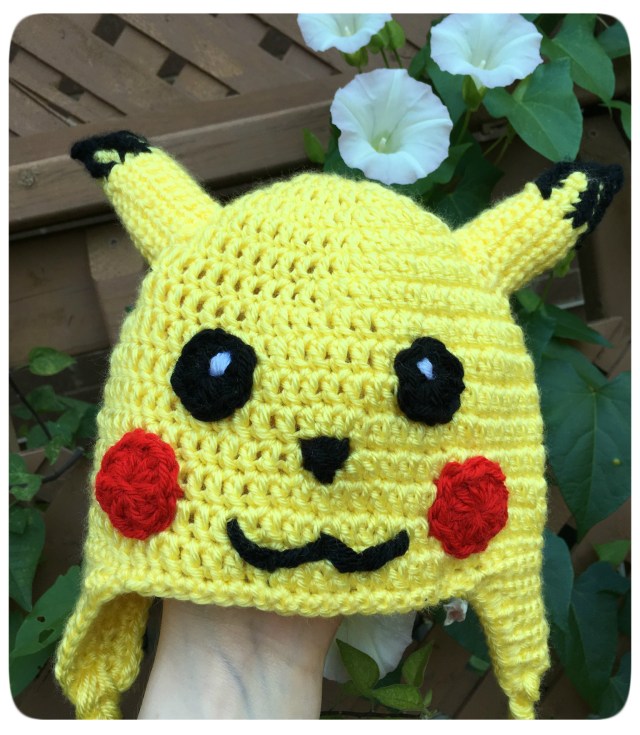
So, I’m tossing my own creations on the pile. I did an adult size Poké Ball hat, and a toddler size Pikachu. I figure parents are always trying to catch their wee ones in the park anyway, so it’s a pretty adorable fit. 🙂

I had a go at writing down the patterns, too! So, if you want to take a crack at them, or just get inspired to make your own, go nuts!
(I bet Pokémon stuff would be really popular to sell at fairs and markets, but since we don’t own the rights to the characters, that’s probably a bad idea, right?)
So, what did you make this week?
XO
Jax
P.s. Last month I got married! It was a fabulous year of planning and prepping, but I’m looking forward to much more stitching now that I have more free time! I’ve already got two other projects on the go… Can’t wait to share them with you!
Click for more pictures and to see the patterns…
 Poké Ball Hat Pattern
Size: Adult
Hook: H/8 5.00
Yarn: Worsted in RED, WHITE and BLACK
Starting in RED yarn:
Create a Magic Ring (or chain three and slip stitch into a circle)
Round #1: 11 DC in magic ring. Join to first DC with a slip stitch. Chain 2
Round #2: 2 DC in each around. Join. Chain 2 (Stitch count: 22)
Round #3: 2 DC in first, DC in next. Repeat around. Join. Chain 2 (Stitch count: 33)
Round #4: 2 DC in first, DC in next 2. Repeat around. Join. Chain 2(Stitch count: 44 )
Round #5: 2 DC in first, DC in next 10. Repeat around. Join. Chain 2 (Stitch count: 48)
Round #6: 2 DC in first, DC in next 11. Join. Chain 2 (Stitch count: 52)
Round #7: 2 DC in first, DC in next 12. Repeat around. Join. Chain 2 (Stitch count: 56)
Round #8: 2 DC in first, DC in next 13. Repeat around. Join. Chain 2 (Stitch count: 60)
Round #9: 2 DC in first, DC in next 1. Repeat around. join with a slip stitch (Stitch count: 64)
Change colours to BLACK:
Round #10: 2 DC in first, DC in next 15. Repeat around. Join. Chain 2 (Stitch count: 68)
Round #11: 2 DC in first, DC in each stitch around. Join. Chain 2 (Stitch count: 70)
Change colours to WHITE:
Round #12: DC in each stitch around. Join. Chain 2 (70 DC)
Round #13: DC in each stitch around. Join. Chain 2 (70 DC)
Round #14: DC in each stitch around. Join. Chain 2 (70 DC)
Round #15: DC in each stitch around. Join. Chain 2 (70 DC)
Round #16: DC in each stitch around. Join. Chain 2 (70 DC)
Round #17: DC in each stitch around. Join. Chain 2 (70 DC)
***Assess length – you can add another DC row or two if you want to add length.***
Round ~#18: SC in each around, join. (70 SC)
Fasten off and weave in the ends.
Poké Ball Centre Appliqué:
Create a Magic Ring (Or chain three and slip stitch into a circle)
In BLACK
Round #1: Chain two (counts as a DC), 12 DC in magic ring, join to beginning chain
Colour change to WHITE:
Round #2: 2 DC in each around, join (Stitch count: 26)
Colour change to BLACK:
Round #3: 2 SC in first DC, 1 SC in second DC, repeat around.
Fasten off leaving a long tail to sew onto hat.

Pikachu Hat Pattern
Size: Toddler
Yarn: Light/DK
Hook: G – 4.25
Create a Magic Ring (or chain three and slip stitch into a circle)
Round #1: 10 DC in magic ring, join to first DC, chain 2
Round #2: 2 DC in each around. Join, chain 2 (Stitch count: 20)
Round #3: 2 DC in first, DC in next, repeat around. Join, chain 2 (Stitch count: 30)
Round #4: 2 DC in first, DC in next 2, repeat around. Join, chain 2 (Stitch count: 40 )
Round #5: 2 DC in first, DC in next 3, repeat around. Join, chain 2 (Stitch count: 50)
Round #6: 2 DC in first, DC in next 24, 2 DC in first, DC in next 24. Join, chain 2 (52 DC)
Round #7: 2 DC in first, DC in next 12. Repeat. Join, chain 2 (56 DC)
Round #8: 2 DC in first, DC in next 13. Repeat. Join, chain 2 (60 DC)
Round #9: 2 DC in first, DC in next 14.Repeat. Join, chain 2 (64 DC)
Round #10-15: DC in each around, join but DON’T FASTEN OFF OR CUT ENDS (64 DC)
Next you need to add the earflaps on each side – get out those stitch markers, and mark where you want your flaps to start! (Your first flap will begin where you left off stitching…) My hat spaces the flaps fairly evenly, but you may want to reposition them to leave a wider space at the front of the hat for the child’s face.
EAR FLAP:
Row #1: SC in 13 stitches across, chain one
Row 2: SC decrease, SC in next 9, SC decrease, chain one
Row 3: SC across 11 stitches
Row 4: SC decrease, SC in next 7, SC decrease, chain one
Row 5: SC across 9 stitches
Row 6: SC decrease, SC in next 5, SC decrease, chain one
Row 7: SC across 7 stitches
Row 8: SC decrease, SC in next 3, SC decrease, chain one
Row 9: SC across 5 stitches
Row 10: SC decrease, SC in next 1, SC decrease, chain one
Row 11: SC across 3 stitches
Row 12: SC decrease, SC in next 1
In your FIRST earflap, you’ll fasten off here, and then begin your second flap.
In you SECOND earflap, proceed to crochet around the entire seam of the hat to smooth the edges. I used HDC stitches along the edge of the earflap to add some extra bulk, and then used SC stitches around the front and back of the hat.
At the end of that, FASTEN OFF.
BRAIDS ON EAR FLAPS:
Cut 8 – 10 pieces of YELLOW (and you could add BLACK, if you want) yarn. Using a hook, pull through the space between the SC and SC Decrease at the bottom of your earflap. (You should have 8-10 12 inch pieces of yarn on each side now)
Separate pieces as evenly as possible and braid.
Tie bottom of braid in one big knot and tug each strand individually to tighten. Trim excess yarn evenly.
Pikachu’s Face and Ears:
CHEEKS (Make Two):
Create a Magic Ring (or chain three and slip stitch into a circle)
Round #1: Make 12 DCs into your ring Fasten off
EYES (Make Two):
Create a Magic Ring (or chain three and slip stitch into a circle)
Round #1: Make 10 HDCs into your ring Fasten off
EARS (Make Two):
This part was a bit tricky and you might want to look around online at the way other people have done Pikachu ears… I wanted the black to look like it was creeping into the yellow… I also wanted my ears to stand up, rather than flopping over like bunny ears. So I made them tubular and gently stuffed them with a bit of batting.
(Don’t over stuff, for some reason this made them look weird and kind of phallic.)
Using YELLOW, Chain 12
Row #1: SC 11 stitches back down the chain. Chain one. Turn
Row #2: SC 8 stitches. Chain one. Turn
Row #3: SC 8 stitches. Chain one. Turn
Row #4: SC 8 stitches. Chain four. Turn
Row #5: SC 3 stitches back down the chain, continue SC 8 stitches down the previous row of SC
REPEAT from Row #2 three more times.
Now you should have what looks like a rectangle with four posts sticking up. Slip stitch or sew this closed to make a tube with four posts all poking out at the top.
I’m new to pattern writing so I am kind of at a loss to describe what I did next… Basically, using BLACK I started at one of the valleys between the yellow posts and attached the yarn.
Then I began SC crocheting the two sides of the posts together with the black, working up and down the posts to make a pointed ear. I did this freehand because I found when you get to formulaic with it, it becomes a bit less wild. I wanted the ears to look like the black was creeping into the yellow.
When you have something you are happy with, stuff and sew onto the hat with yellow yarn. Try to sew them towards the front of the hat, rather than right on the centre line, if you folded it.
NOSE and MOUTH:
I just stitched these freehand! 🙂
You could also use felt or ribbon or something…

Cute projects! 😊
LikeLike
Thanks! I had fun. 🙂
LikeLike